|
Working with Globodox |


|
|
Working with Globodox |
|
| You are here: Getting Started >Working with Globodox |
Working with Documents
When you start Globodox, the default node selected is All Documents. The All Documents node displays all documents that the currently logged-in user is allowed to view. By default 50 documents are displayed in the List View pane. To view more documents, use the navigation buttons at the bottom of the List View pane. To view documents as Thumbnails, click the Views button that is located towards the left of the Search box and then choose Small Thumbnails, Medium Thumbnails or Large Thumbnails. Select the List View option from the Views drop-down to view documents as a list.
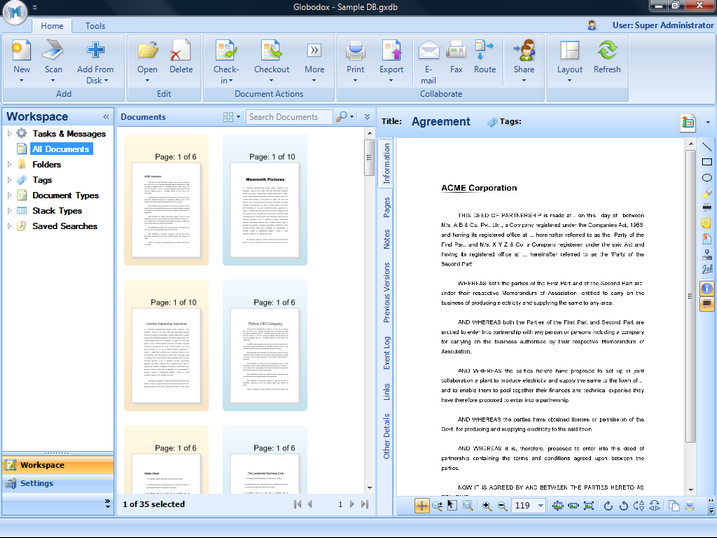
Document Details Window
Details of the document selected in the List View pane are displayed in the Details View (Display) pane. You can also double-click any document in the List View pane, to open it in a separate window called the Document Details window.
Document Details Window
The Document Details window has the actions toolbar on top, towards the right is the Annotation toolbar and at the bottom is the Image toolbar. The document title is displayed in the Title box. Modify the text in this box, to change the document title. Tags can be added to a document using the Tags box. You can also remove existing tags using this box. Use the Navigation buttons on the top right corner of the Document Details window to go the next or previous document. Use the Navigation button on the Image toolbar to navigate between the pages of the document.
On the left side of the Document Details window there are tabs, they are Information, Pages, Notes, Previous Versions, Event Log, Links and Other Details.
| • | Information: The Information pane displays the Document Type of the document as well as the indexing information entered for the document. You can add or modify the indexing information from this pane. In addition to indexing information about the document type, this pane also gives information about... Related Folder: If the document is stored in a folder, then the name of that folder is displayed in this box. You can also change the document's folder using this box. Related Stack: If the document is part of a stack, then the name of that stack is displayed in this box. You can also change the stack using this box. |
| • | Pages: The Pages tab displays all the pages of the document as thumbnails. The Pages panel also displays any Bookmarks created in the document. Thumbnails for certain file types will not be displayed. |
| • | Notes: The Notes tab displays the notes or comments entered by users, about the document. |
| • | Previous Versions: The Previous Versions tab displays the older versions of the document. |
| • | Event Log: The Event Log tab displays the actions carried out on the document. The actions will only be displayed if the Event logging feature is enabled. The Event Log can be enabled from the Settings pane. |
| • | Links: The Links tab displays the documents or stacks that are linked to the document. You can also link the document to another document or stack from this pane. |
| • | Other Details: The Other Details tab displays additional information about the document. |
Close the Document Details window.
We will now create a folder and then add a document to our new folder.
To create a folder, expand the Folders node and click Create New. A new folder will be created, enter a name for the folder and hit the Enter button. The new folder will be created and automatically selected.
Now on the Home tab, click the Add from disk button. The Add Files window will now be launched. Select one or more files that you want to add and click the Open button. The documents will now be added to Globodox and will be listed in the new folder.
The simplest way of adding a document to Globodox is by dragging and dropping the document on the All Documents node, on any Folders node, on any Tag node or on any Document Type node. If you have an existing Folder structure that you use to manage your documents, you can use the Add Folders from Disk option to import the entire folder structure along with the documents to Globodox. You can also import multiple documents along with their indexing information from a CSV file.
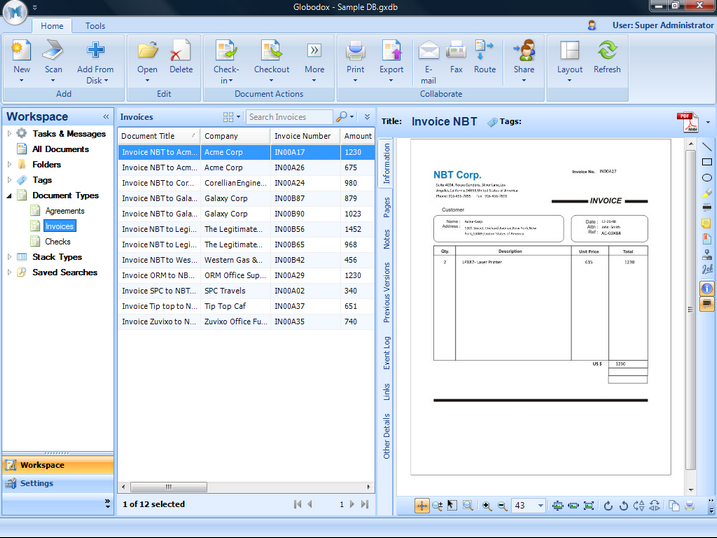
Document Types
Double-click the document that you just added to the folder to open it in its Details window. In the Information pane, you must have noticed that there are no indexing fields. This is because no document type has been set for this document (see Managing your documents).
Now in the Information tab, select a Document Type for the document. You can create a new Document Type, if the document does not belong to the types that are listed in the Document Type drop-down. Document Types can be created from the Settings node of the Navigation pane.
To view documents based on their types, in the Globodox main window, expand the Document Types node in the Navigation pane and select a document type (e.g. Invoice). All the documents that have their Document Type set to Invoice will now be displayed in the List View pane.
Document Actions
All the actions that are required in order to work with documents, are available on the Home tab or on the right-click menu of the respective document in the List View pane. Below are some of the actions that are available from the Home tab:
| • | Email: Select the document(s) and then click the Email button on the Home tab to mail the documents. Alternatively, you can right-click the document(s) in the List View pane and then select the Email option, to mail the documents. |
| • | Fax: Select the document and click the Fax button on the Home tab. Documents can also be faxed by right-clicking the document and then selecting the Fax option. |
| • | Print: Select the document(s) and then click the Print button on the Home tab to print the documents. Or you can right-click the document(s) in the List View pane and then select the Print option to print the documents. |
| • | Checkout: Select a document and then click the Checkout button to check-out a document. Or you can right-click the document and then select the Checkout option to check-out the document. |
| • | Check-in: Select a checked-out document and then click the Check-in button to check the document back in. Or you can right-click a checked-out document and then select the Check-in option to check the document back in. |
| • | Share: Select a document and then click the Share button to share the document with other Globodox users. Or you can right-click a document and then select the Share option to share the document with other Globodox users. You can also control what actions the users can carry out on the shared document. |
| • | Assign: Click a document, click the Share button and then click the Assign option. Alternatively, you can right-click a document, select the Share option and then further select the Assign option to assign the document to another Globodox user (the user to whom the document is assigned will become the owner of that document). |
| • | Restrict: Restrict documents owned by you from other users. |
Annotation
You can use the Annotation toolbar on the right bar of the Details pane to mark, highlight, hide certain parts of the document and perform certain other actions. You can zoom, rotate or flip a document by using the Image toolbar at the bottom of the Details pane.
Full Text Search/OCR
Use the Full Text feature to search for text in a document. The Full Text Search feature works by extracting text from documents that you add to a Globodox DB and then indexing the text.
To extract text manually from the document(s), right-click the document and select the Extract and Index option.
Text extraction is done by using OCR (for image files) and IFilters (for other file types) installed on the user's machine. IFilters act as plug-ins and are a part of Microsoft Indexing Service (they are also used by Windows Desktop Search). For Globodox to be able to extract text from a file of a particular format, an IFilter for that file format must be installed on the user's machine.
OCR is done by using the built-in OCR engine or it can also be done by using the Microsoft OCR engine (to use this feature you must have Microsoft Office Document Imaging installed). To select your default OCR engine, click the Globodox button > Options... > User Options > Extract & Index.
Note: When a document is added or checked-in to Globodox, it is automatically indexed by the "ITAZ Globodox Indexing Service" at periodic intervals.
Working with Stack Types
For information about Stack Types, see Managing your documents
Stack Details Window: The Stack that is selected in the List View pane will be displayed in the Details pane. You can also double-click a Stack in the List View pane, to open it in its separate Stack Details window.
This is the Stack Details window. On the left side of the Document Details window there are the Information, Notes, Event Log and Links tabs. Towards the right is the Annotation toolbar and at the bottom is the Image toolbar. Use the Navigation button on the top right corner of the Details window to go the next or previous Stack. Use the Navigation button on the Image toolbar to navigate between the pages of the selected document.
On the left side of the Document Details window there are the Information, Notes, Event Log and Links tabs.
| • | Information: The Information pane displays the indexing information and the related documents of the Stack. You can add or modify the indexing information from this pane. You can also relate the document to the Stack from this pane. If there are documents related to this then their preview will be displayed in the Display pane of this window. |
| • | Pages: The Pages pane will only appear if a document is related to a Stack. If no documents are displayed then the Pages pane will not be displayed. The Pages pane displays all the pages of the selected document as thumbnails. The Pages pane also displays Bookmarks of the selected document. Thumbnails for certain file types will not be displayed. |
| • | Notes: The Notes pane displays the notes or comments entered by users, regarding the selected Stack. |
| • | Event Log: The Event Log pane displays the logs (actions) carried out on the selected Stack. The actions will only be displayed if the Event logging feature is enabled. Event Log can be enabled from the Settings pane in the Globodox main window. |
| • | Links: The Links pane displays the documents or stacks that are linked to the selected Stack. You can also link a Stack to another document or stack from this pane. |
Close the Stack Details window. Now lets add a Stack, assuming that the Vendors Stack Type is selected. In the Home tab, click the New button. The New Stack window will now be launched. Enter the information of the Vendor. Click the Save button to save the information.
Now, lets relate the document(s) to this Stack. In the Information pane, click the Add button on the documents list section. To add documents from Globodox, select the Relate existing document(s) option. To add files from disk (outside Globodox) select the Add files from disk and relate option. The simplest way of relating a document to a Stack is by dragging and dropping the document to the document list section. A document can at anytime be part of only one stack. When a stack is deleted then all documents in the stack will also be deleted. If you do not want this, remove the documents from the stack before deleting the stack.
That's It! Now that you are familiar with Globodox, you can go ahead and start adding documents to it. We recommend you first learn to add documents and then learn things like creating Document Types and Stacks.
Page URL: https://www.globodox.com/support/help/index.htm?working_with_globodox.htm